Export files in XBRL
What is XBRL/iXBRL?
In many jurisdictions, the local authorities expect their companies to file certain data regularly. The requested data can range from information about taxation to data about financial performance or compliance. To facilitate and standardise this data transmission, these authorities often work with XBRL.
XBRL stands for eXtensible Business Reporting Language and is a framework for exchanging business information. It allows communications between different parties to be defined by metadata that is set out in taxonomies (using special and pre-defined tags).
Next to that, there is also something called iXBRL (inline XBRL), an open standard that enables a single document to provide human-readable and structured, machine-readable data. Inline XBRL allows you to incorporate your XBRL tags into your HTML-formatted financial statements, rather than filing a separate XBRL instance document. This keeps the human-readable HTML format of the financial statements the same when viewed in a web browser while adding the XBRL tagging to those statements.
Process flow
A couple of steps are needed before an (i)XBRL export can be taken and filed. Each step is required in the process to be able to successfully export the data:
- Taxonomy upload
- Export file preparation
- XBRL file generation and validation
1. Taxonomy upload
In Silverfin, XBRL files are generated via the s(mart)XBRL engine. As soon as a new taxonomy is released, our backend engineers process the available .xsd file and store it in the Silverfin platform. As soon as it has been added to the engine, a valid (i)XBRL file can be generated for that specific taxonomy.
2. Export file preparation
Creating an export file
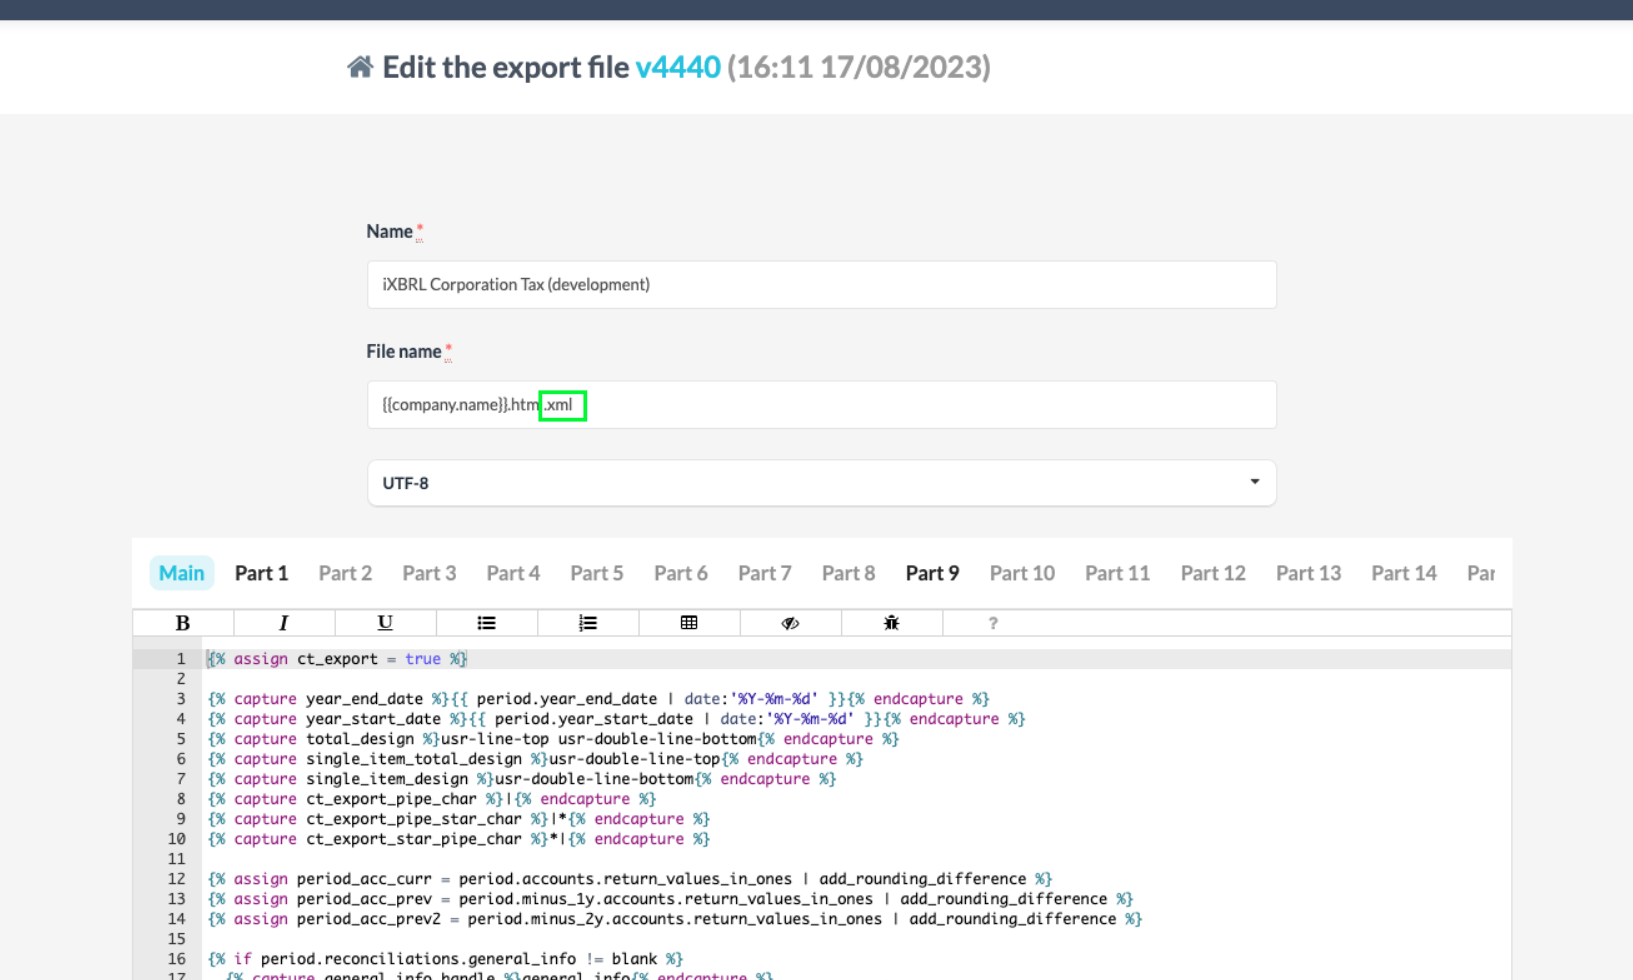
Once the taxonomy is released and uploaded in Silverfin, an export file can be created. Both a name and a file name will be required.
- The chosen ‘Name’ will be shown as the name of the export file on company level, so make sure the name is descriptive enough for the user to understand.
- The file name is how the export file will be called eventually. It is here that the users can add the required extension for their files.
- XBRL does require the .sxbrl extension and will result in an XBRL file being generated.
- For iXBRL, the extension .html.sxbrl is needed. The resulting file will be an HTML file (and thus not an XBRL file).
- Lastly, there is also the option to change the encoding type of the file.
- The default (UTF-8) is a multibyte encoding that can represent any Unicode character. This option will have to be selected if you do have a lot of foreign language materials.
- ISO 8859-1, on the other hand, is a single-byte encoding that can represent the first 256 Unicode characters.
The default version supports more characters and language-specific characters and is in most cases the preferred option.
Example:
.png")
Code structure
Export files have a strict code structure. Deviating from the structure will break the XBRL file that is being generated.
The structure can be divided into three different layers, each with its own function.
Top layer (XML tagging and XBRL context)
The first few rows of an export file are always used to make a reference to the file type (which will normally be XML) and to the taxonomy file (.xsd format).
XBRL
.png")
iXBRL
.png")
Next, we have the code that is used to define the XBRL context. The attributes that are defined in this section will apply to the entire XBRL code that follows (unless it is overwritten somewhere).
These attributes are taxonomy specific and can contain information about:
- Decimals
- Start/end dates
- Currency
- Entity identifier
- Date formatting
- Remove blanks/zeros
Example BE Taxonomy:
.png")
Middle layer (iXBRL - HTML & CSS) - Optional
Note that this layer is not required for simple XBRL files, but if we would want to make the XBRL document human-readable, an additional HTML/CSS layer needs to be added to the XBRL file. This can be done by embedding the CSS styling in the iXBRL document directly (Embedded CSS).
The HTML file will only be styled if the CSS file is declared directly in the document. External references to a CSS file are not supported, so using them won’t style the export file at all. Next to that, it is also important to mention that script tags inside the CSS code are not allowed either. The big advantage of all this, is that the HTML file will load much faster because we do not have to make requests to external files.
Example CSS:

- By adding the CSS code to a different part, and including it in the file.
- By nesting the code directly inside the head tag.
Example of using a different part:
.png")
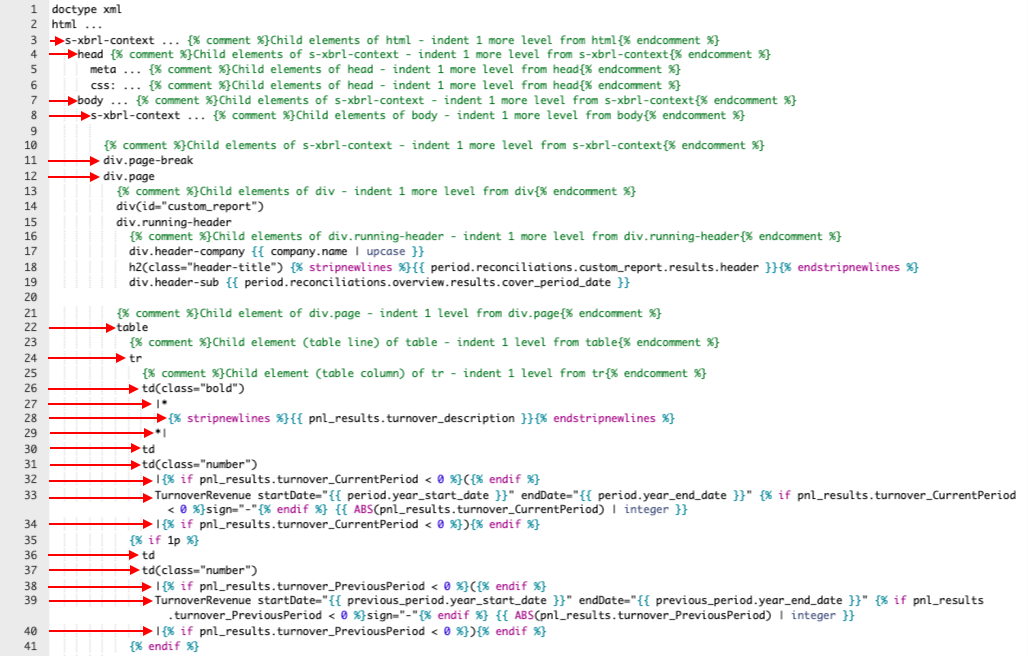
By default, the HTML tags used in an export file should follow a "Slim" syntax, which looks like this:

But, a combination with regular HTML (especially, HTML tables that are used in liquid templates) can be included. For example:

It is important to note that tags
doctype,head,css:andbodyshould always use the Slim syntax, as seen in the previous image. It is required by Silverfin sXBRL smart engine to identify XBRL tags while generating the export file. Only the content of thebodycan use regular HTML syntax if needed
CSS classes
If you are sharing your HTML tables between reconciliations and export files, you could use these CSS classes as a starting point to style your tables in your export file. Also check out this community case on the topic.
css:
  {% for i in (1..100) %}
  .usr-width-{{ i | integer }} { width: {{ i | integer }}%; }
  {% endfor %}
  .usr-align-left { text-align: left; }
  .usr-align-center { text-align: center; }
  .usr-align-right { text-align: right; }
  .usr-align-justify { text-align: justify; }
  .usr-valign-top { vertical-align: top; }
  .usr-valign-center { vertical-align: middle; }
  .usr-valign-bottom { vertical-align: bottom; }
  .usr-bordered { border: 1px solid; }
  .usr-line-left { border-left: solid; }
  .usr-line-right { border-right: solid; }
  .usr-line-bottom { border-bottom: solid; }
  .usr-line-top { border-top: solid; }
  .usr-double-line-top { border-left: double; }
  .usr-double-line-bottom { border-bottom: double; }
  .usr-double-line-right { border-right: double; }
  .usr-double-line-left { border-left: double; }
  {% for i in (1..10) %}
  .usr-indent-{{ i | integer}} { text-indent: {{ i | integer }}em; }
  {% endfor %}
Bottom layer (XBRL tags and Liquid code)
The largest part of the export file code will be in the bottom layer, which consists of both tags and dimensions. Every value in the XBRL file is represented by a unique combination of a tag, a dimension, and some tag properties. These tags and dimensions are always stored in a JSON file of a taxonomy package, they can be hidden or visible, and they are always tagged as absolute values.
CostSales
	ContinuingDiscontinuedOperationsDimension="ContinuingOperations" startDate="2020-12-31" endDate="2021-12-31"
Properties on the other hand can be general (think of schema, decimals, scale, date, monetary unit...) or data type specific (monetary, string, decimal, shares, date, boolean...).
sXBRL-engine
As explained before, Silverfin is using the sXBRL-engine for XBRL files. Without this engine, every possible XBRL tag would need to be coded literally (including all the attributes).
Without sXBRL engine:
<pfs:SomeTagExample>
 <pfs:SomeTagExampleTitle contextRef="CurrentDuration">
   Some title
 </pfs:SomeTagExampleTitle>
 <pfs:SomeTagExampleValue decimals="INF" contextRef="CurrentDuration" unitRef="U-EUR">
   200
 </pfs:SomeTagExampleValue>
</pfs:SomeTagExample>
With sXBRL engine:
SomeTagExample
    SomeTagExampleTitle Some title
    SomeTagExampleValue 200
The engine will identify and create the correct attributes for each tag in the background, so by using the correct name of the tag, it will be populated in the correct way.
Hence also the reason we need to upload the taxonomy to our XBRL engine: if a new tag is used in the new taxonomy, and we refer to it in our export while the taxonomy isn’t uploaded yet in our engine, the export would not know how to create the tag, and it would lead to an XBRL error.
Indentation is of utmost importance when using tags, if proper indentation is not respected, it will break the XBRL file.
More information about indenting can be found in this section.
Prefix on tags
XBRL tags may have unique prefixes, based on the type of tag.
You can specify the prefix using the following syntax:
prefix:TagName
Example UK Taxonomy
{
  "prefix": "dpl",
 "name": "AdministrativeExpenses",
 "namespace_uri": "http://xbrl.frc.org.uk/dpl/2022-01-01",
 "period_type": "duration",
 "base_type": "string"
 },

 {
  "prefix": "core",
 "name": "AdministrativeExpenses",
 "namespace_uri": "http://xbrl.frc.org.uk/fr/2022-01-01/core",
 "period_type": "duration",
 "numeric": true,
 "base_type": "monetary",
This would result into:
dpl:AdministrativeExpenses

core:AdministrativeExpenses
Liquid code
As illustrated in some of the examples above, an XBRL file is written as a combination of XBRL tags and liquid. In the most straightforward example, one XBRL tag would be linked to one specific field in a template. In the export file, we can generate that result by using result tags (more information on result tags here).
EntityInformation
  EntityAddress
    Street {{ period.reconciliations.company_information.results.company_street }}
Of course, also for the dimensions and other attributes linked to an XBRL tag, liquid coding can be used. In the example below (containing XBRL context definition), attributes like startDate, endDate and entityIdentifier are all populated via liquid logic.
s-xbrl-context decimals="2" startDate="{{ period.year_start_date }}"
endDate="{{ period.year_end_date }}"
unit="iso4217:EUR"
entityIdentifier="{{ period.reconciliations.company_information.results.company_identifiervalue }}"
entityScheme="http://www.fgov.be" instantDate="{{ period.minus_1y.year_end_date }}"
removeIfZero="true" removeIfBlank="true"
General guidelines on tagging
-
Each data element should have a unique XBRL presentation (tagged in a unique way). If there are several data elements that fall under the same category (pure tag), dimensions should be used in the format:
TagDimension=“DimensionValueAsPerJSON”. XBRL tags and dimensions that need to be used will depend on the schema that you will be working with. -
A special character in the name of a tag, such as a
., needs to be escaped with\in order for the tag to render correctly. Example:TeachingMaterialsIncl\.BooksEtcOtherCostsTeaching. - There can be as many dimensions as needed to uniquely tag a data element. Refer to the taxonomy to check available dimensions and the values applicable to a tag.

- Sales -
TurnoverRevenue DetailedAnalysisDimension="Item1" - European sales -
TurnoverRevenue CountriesDimension="RestEuropeOutsideUK" DetailedAnalysisDimension="Item2" - Rest of world sales -
TurnoverRevenue CountriesDimension="RestWorldOutsideUK" DetailedAnalysisDimension="Item3"
Note that the same combination of tag and dimension will be used per line item in the example above. However, their period type(startDate="{{ period.year_start_date }}" endDate="{{ period.year_end_date }}"for the 2019 value andstartDate="{{ period.minus_1y.year_start_date }}" endDate="{{ period.minus_1y.year_end_date }}"for the 2018 value will be different, which will make the tagging unique and valid.
- Sales -
- Some tags are mandatory to be present in the XBRL file filed to financial authorities. However sometimes, they are not to be displayed in export itself. In that case, hidden tags can be used. These tags should be implemented at the top of the file before the code of the visible tags is being rendered. The full list of mandatory tags should be found in taxonomy specification.
- Indentation is important for correct rendering of CSS and tags, and mapping to the schema.
- Indent by 2 spaces/tab at a time. Do not mix tabs and spaces for indentation.
- Use a new line for every block, list, or table element, and indent every such child element.
- Tags should always start on a new line and its content/child elements should be indented where applicable.
- The sXBRL engine will always try to convert the first item in a row into a tag. If you want to include the content in the export and there is no tag in the current row, you should include a pipe
|at the very beginning - Sometimes, strings can start with non-alphanumeric characters. To correctly render and display it, use
|* ... *|around it. - In iXBRL export file, use
newline_to_brto display a string that takes multiple lines in export. This will replace every newline(\n)in a string with an HTML line break.
Hidden tags follow under
s-xbrl-context hidden="true" CSS style element, while visible information follows under s-xbrl-context CSS style element.
Example of hidden tags:

Especially when we are including text that has been defined in an input field from a template, we should use the |* syntax around the result or custom drop that we are using. This is to avoid special characters as mentioned before, but also to escape any possible html tags that could be included in those fields.
indent:auto
The auto-indenting feature controls the level of indentation as you add new parts (regular or shared parts) to existing code. This means that adding the indent:auto to your include-tag will automatically bump the part to the right level.
This saves you the hassle of having to reindent every single line manually and limits the risks of breaking export-files.
{% include "part" indent:auto %}

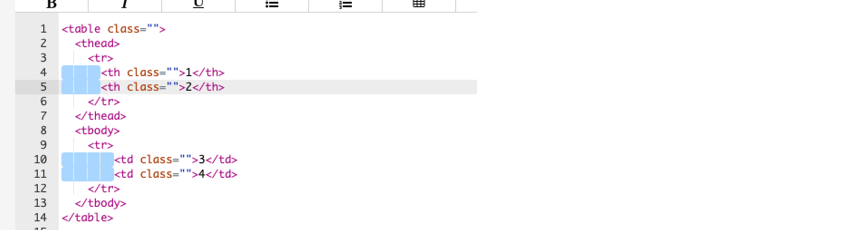
Important notes:
It is important that the included HTML table has consistent indentation on the <tr> level and within the <tr> itself. Each <td> should always be consistent within one <tr> element but can be inconsistent with other same level elements like <th>.
Examples
1) Monetary value tagging (iXBRL) - UK
{% comment %}Table{% endcomment %}

table
  {% assign value = 335 %}
  tr
    td Cash and Cash Equivalents
    td
      |{% if value < 0 %}({% endif %}
      CashBankOnHand instantDate="{{ period.year_end_date }}" {% if value < 0 %}sign="-"{% endif %} {{ ABS(value) | integer }}
      |{% if value < 0 %}){% endif %}
- Notice the usage of HTML syntax (table, tr, td)
- Only absolute values are being tagged (the variable value can be negative, hence the
ABS()). - There is a check to see if the value is smaller than zero. If this is the case, brackets will be added for display purposes.
- For system to recognise the sign of the value property
sign="-"is added.CashBankOnHandhas an expected "debit" balance. If the value of cash is positive, nosign="-"property should be added to the tag, if the cash is negative,sign="-"property should be added to the tag. - "date" property should be added.
CashBankOnHandis an instant tag (as opposed to a tag with an end and start date), therefore, the instantDate property is added. - In the default
decimalFormat="numdotdecimal"property, zeros cannot be shown as dashes "-" in iXBRL. Therefore, either integer filter should be used for the value, or{% currencyconfiguration %}tag with“negative_format”set to "0". - Notice the usage of
|. Without it, these two rows would be displayed as a string in the export file.
2) Tax and tax exempt reserves (XBRL) - BE Corporate Tax
.png")
.png")
- As this is XBRL, there is not HTML syntax present in this piece of code.
- In the XBRL tag
TaxableProvisionstwo values need to be included: one for the previous year and one for the current year - In the context, instantDate was already defined as
{{ period.year_end_date }}, which is applicable to the whole document. - We have to specifically overwrite this context definition to be able to tag the Taxable provisions of the previous year. This is being done in row 108.
- For the current year, we can again refer to the instantDate in the context, so there is no need to redefine it.
- The values are fetched by calling results from another template, so they are not hard-coded.
3) Equity and liabilities note (iXBRL) - DK
 (1).png")
- This is an example of iXBRL, so there is HTML code present in the code
- We are using pre-defined CSS classes to style the document (e.g. note-column, width1...). These were defined separately in the document.
- On line 3257, we are using |, because we do not want to print this line. Instead, the locale will convert the value to the correct local formatting.
- As in the first example, we are checking again if the value is negative to add a “-” sign for visual formatting.
- There is logic to see if we need to show the previous year (see row 3260).
- If a previous year needs to be shown, we repeat the logic for the current year, with the addition of
{{ preceding_per }}. This will again overwrite the instantDate definition in the context.
3. XBRL file generation and validation
Once an export file is added and populated on firm level, XBRL files can be downloaded from Silverfin on company level. The user can select the applicable XBRL/iXBRL file they want to download, and the process to generate the export will start.
First, all the logic defined in liquid will be executed, populating the information needed, by taking it from other templates. Later, the sXBRL engine will parse this export file to generate the tags needed (XBRL and HTML elements if applicable). XBRL tags are generated using the schema created from the taxonomy .xsd files. Lastly, the generated tags are then populated with the correct and pre-defined values.
The resulting file will be in .xbrl or .html format and should be final. However, to be completely sure that the syntax of the file is correct, it is best practice to check the file with an external XBRL file validator. These validators will not check the content but will confirm if the tagging is being done in the correct way. Once all this is done without any issues, the file can be uploaded directly to the specific filing platform.
For some markets, it is possible to file your (i)XBRL directly with Silverfin to the correct instances.
4. Debugging XBRL
Imagine having followed all of the rules above and still getting a fatal error on your XBRL export... 😱
Let’s debug!

On first sight, one would be happy that there’s a reference to the line number where the error is located.
However, this reference is the line number in the XML file, not the XBRL file so it would often still require a significant amount of manual effort from the developer to locate this error.
How to download XML?
Fortunately, you can easily convert any export file into a descriptive XML file by simply adjusting the extension on the export file: company.name.html.sxbrl becomes company.name.html.xml
This will render the entire text in its original state (XML) before it is sent to the XBRL engine and thus allow you to easily find the line number where the fatal error is located.
Tip: to prevent users rendering incorrect files, always duplicate the export file on firm-level and adjust the extension for XML export instead of changing the extension on the existing XBRL export template. 💡
Debugging with the XML file
-
The name of the template including the outline that is used in the export-file.
      	|*

		     Template name

    		*|
- HTML table tags; any missing or inconsistent tags can be spotted more easily
- XBRL tags and their dimensions, including the client’s data.

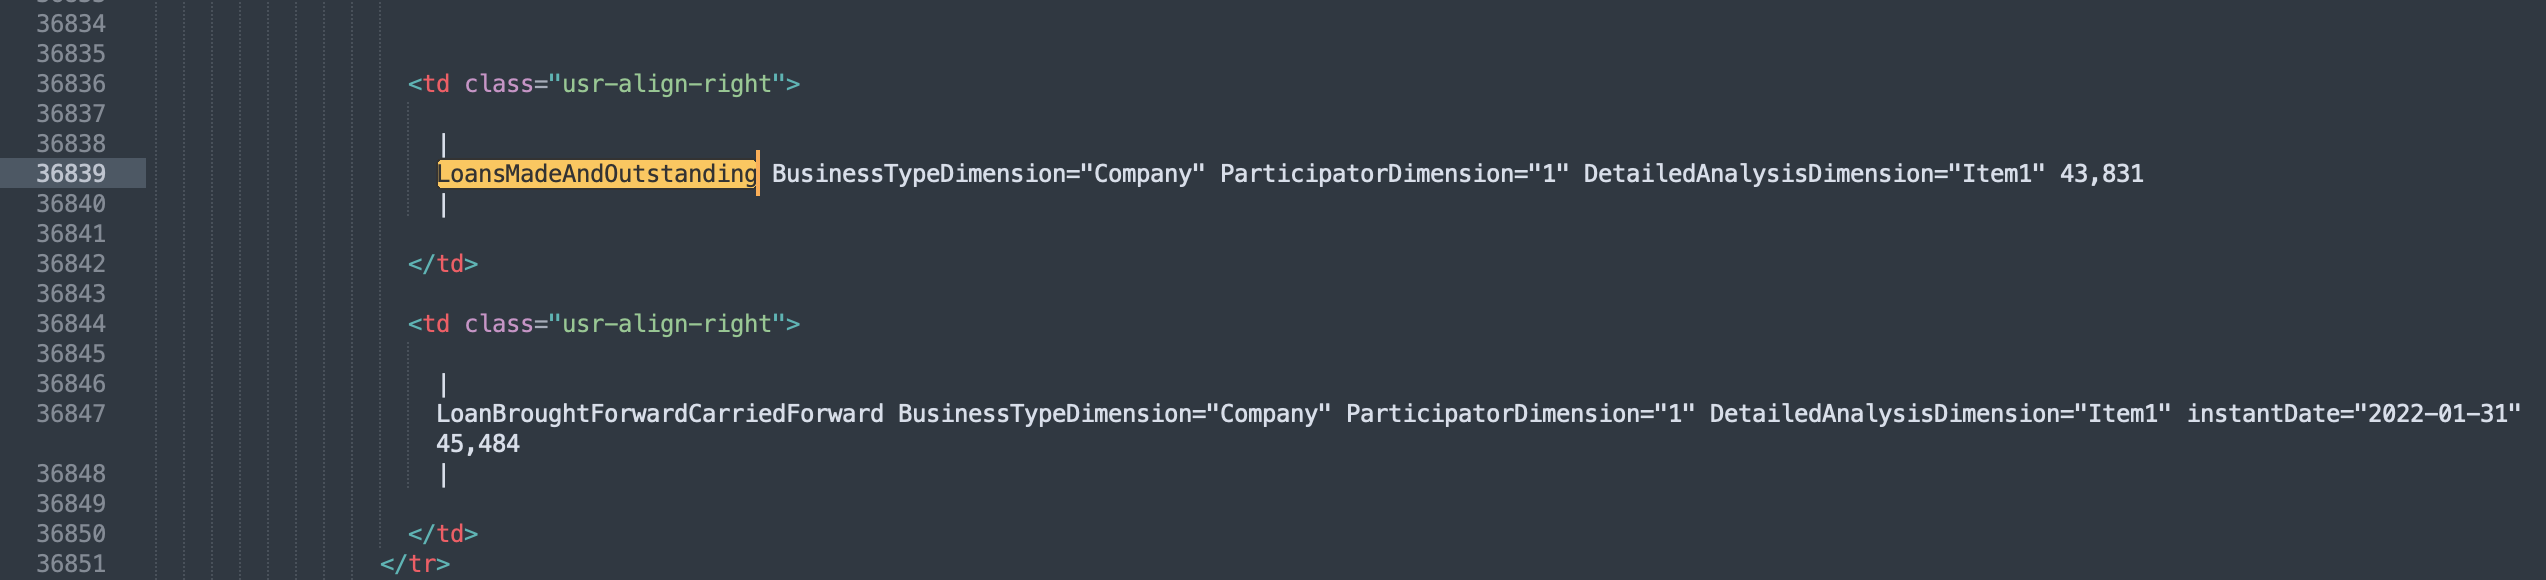
As the XML export holds all the tags, template names and the client file’s content: debugging just got a lot easier! 😋
Alternative debugging
Debugging using the iXBRL file and inspector (non-fatal errors where file is still rendered).
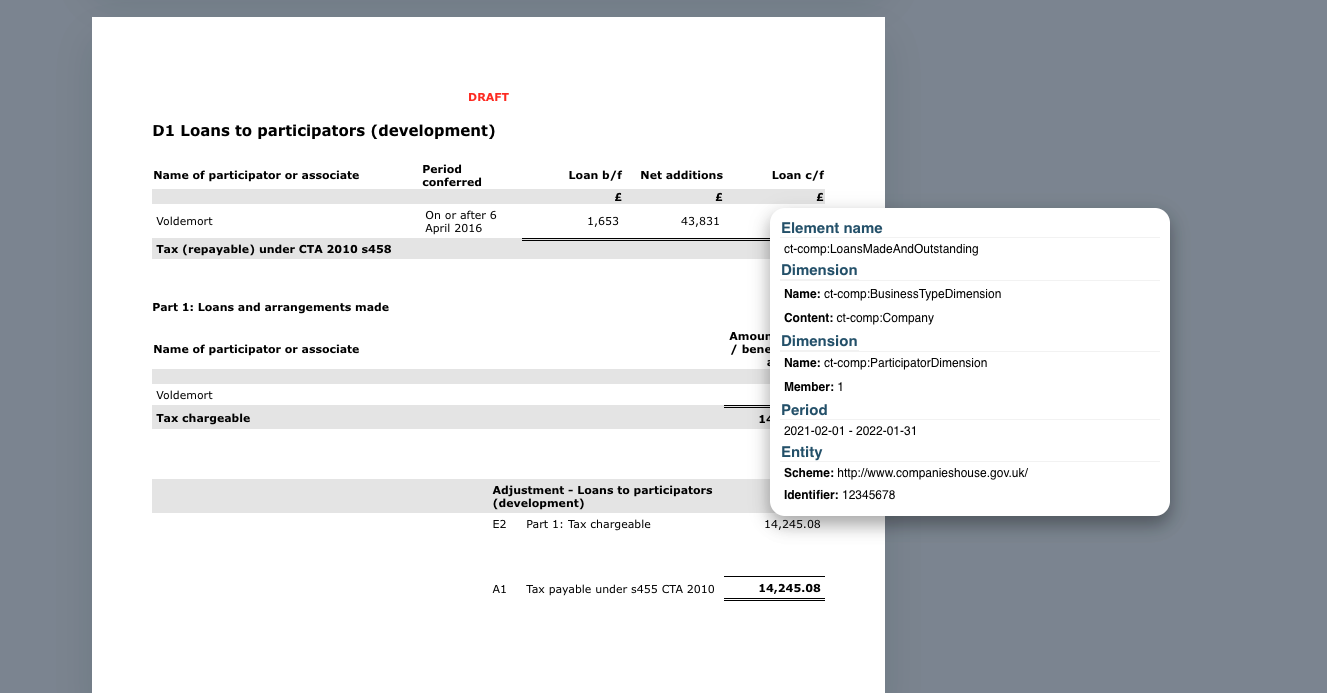
To access the iXBRL inspector, add the following JavaScript function as a bookmark in your browser. If you then need to activate the iXBRL inspector, you only need to click on this bookmark.
javascript: (() => {let xbrlTagsNonNumericArray = Array.from(document.getElementsByTagName('ix:nonnumeric'));let xbrlTagsNumericArray = Array.from(document.getElementsByTagName('ix:nonfraction'));let xbrlTagsContinuationArray = Array.from(document.getElementsByTagName('ix:continuation'));let xbrlTagsArray = xbrlTagsNonNumericArray.concat(xbrlTagsNumericArray).concat(xbrlTagsContinuationArray);/* Create HTML tables */addCSS();createHTMLTableHiddenElements();searchForHiddenTags();checkHiddenTags();createHTMLTable();/* Add event listener to log value that calls the function (has to be annonymous fx that calls the fx with parameters) */xbrlTagsArray.forEach(xbrlTag => findParentElement(xbrlTag).addEventListener('mouseenter', function(){fillAndMoveTable(xbrlTag)}));xbrlTagsArray.forEach(xbrlTag => findParentElement(xbrlTag).addEventListener('mouseleave', function(){hideTable()}));/* function parentElement */function findParentElement(obj){ let parentEl = obj.parentElement; /* check ONLY one more level for TD, there are cases with out any TD */ if (parentEl.parentElement.nodeName == "TD") { return parentEl.parentElement } else { return parentEl };};/* function that return xbrl tag name */function tagName(obj) { return obj.getAttribute('name');};/* function to look for period */function getPeriods(obj) { /* Get contextref of this element */ let contextID = obj.getAttribute(['contextref']); /* search for xbrl-context element */ let contextElement = document.getElementById(contextID); /* get period element */ let periodElement = contextElement.getElementsByTagName('xbrli:period')[0]; /* get possible elements */ let startDate = periodElement.getElementsByTagName('xbrli:startDate')[0]; let endDate = periodElement.getElementsByTagName('xbrli:endDate')[0]; let instantDate = periodElement.getElementsByTagName('xbrli:instant')[0]; /* return values */ if (instantDate) { return instantDate.innerHTML } else { return startDate.innerHTML + " - " + endDate.innerHTML };};/*function to look for the first tag of a Continuation tag */function getMainTag(obj) { if (obj.nodeName == "IX:CONTINUATION") { /* get the id of the current tag */ let currentTagId = obj.id; /* get previous element */ let previousElement = document.querySelector('[continuedAt='+currentTagId+']'); /* Is the previous element another continuation tag ? */ return getMainTag(previousElement); } else { return obj; };};/* function to check the dimensions */function checkDimensions(obj) { /* Get contextref of this element */ let contextID = obj.getAttribute(['contextref']); /* Search for element with that id */ let contextElement = document.getElementById(contextID); /* get scenario or segment element */ let scenarioElement = contextElement.getElementsByTagName('xbrli:scenario')[0]; let segmentElement = contextElement.getElementsByTagName('xbrli:segment')[0]; /* check scenario element */ if (scenarioElement !== undefined) { scenarioArray = Array.from(scenarioElement.children); } else { scenarioArray = new Array(); } /* check segment element */ if (segmentElement !== undefined) { segmentArray = Array.from(segmentElement.children); } else { segmentArray = new Array(); } /* dimensions Array */ let dimensionsArray = scenarioArray.concat(segmentArray); let dimensionsObjArray = new Array(); /* check if Array is not empty and loop */ if ( dimensionsArray.length ) { for ( var i = 0; i < dimensionsArray.length; i++) { /* get scenario-segment first child element */ let dimensionElement = dimensionsArray[i]; let dimension = dimensionElement.getAttribute(['dimension']); let content; /* check tag */ if (dimensionElement.nodeName == "XBRLDI:EXPLICITMEMBER") { /* EXPLICIT MEMBER */ content = dimensionElement.innerHTML; } else { /* TYPED MEMBER: one level deeper */ content = dimensionElement.firstElementChild.innerHTML; } /* append to array */ dimensionsObjArray.push({ "dimensionName": dimension, "dimensionContent": content, }); } }; /* return array with dimensions or empty */ return dimensionsObjArray;};/* function to get scheme and identifier */function getSchemeAndIdentifier(obj){ /* Get contextref of this element */ let contextID = obj.getAttribute(['contextref']); /* Search for element with that id */ let contextElement = document.getElementById(contextID); /* get scenario element */ let identifierElement = contextElement.getElementsByTagName('xbrli:identifier')[0]; /* check identifierElement */ let scheme = identifierElement.getAttribute(['scheme']); let identifierContent = identifierElement.innerHTML; return { "scheme": scheme, "identifier": identifierContent, };};/* Create CSS rules */function addCSS() { let style = ` div.xbrl-table { background-color: white; border-radius: 15px; padding: 10px; font-family: Lato, sans-serif; font-size: 12px; width: 400px; box-shadow: 0 10px 16px 0 rgba(0,0,0,0.2),0 6px 20px 0 rgba(0,0,0,0.19) ; } div.xbrl-table th.xbrl-hover-title { font-size: 15px; color: #20516A; background-color: white; text-align: left; word-break: break-word; border-bottom: 1px solid #F2F2F2; } div.xbrl-table td.xbrl-hover-content { font-size: 12px !important; color: black !important; background-color: white !important; text-align: left; word-break: break-word; } .show-table { opacity: 1; transition: opacity 1s; } .hide-table { opacity: 0; transition: opacity 1s; }`; let styleElement = document.createElement("style"); styleElement.innerText = style; document.head.appendChild(styleElement);};/* Create table (HTML and CSS) */function createHTMLTable() { var divXbrlTable = document.createElement("div"); divXbrlTable.innerHTML = ` <div class="xbrl-table" id="xbrl-hover-table"> <table style="width: 100%; margin-bottom: 0px"> <tbody> <tr class="xbrl-element-row"> <th class="xbrl-hover-title" id="xbrl-name-title"> Element name </th> </tr> <tr class="xbrl-element-row"> <td class="xbrl-hover-content" id="xbrl-name-content"> </td> </tr> <tr> <th class="xbrl-hover-title" id="xbrl-period-title"> Period </th> </tr> <tr> <td class="xbrl-hover-content" id="xbrl-period-content"> </td> </tr> <tr> <th class="xbrl-hover-title" id="xbrl-entity-title"> Entity </th> </tr> <tr> <td class="xbrl-hover-content" id="xbrl-scheme-content"> </td> </tr> <tr> <td class="xbrl-hover-content" id="xbrl-identifier-content"> </td> </tr> </tbody> </table> </div>`; document.body.appendChild(divXbrlTable); /* Starting point: hidden */ hideTable();};function findLastElementRow() { let tableElements = document.querySelectorAll(".xbrl-element-row"); return tableElements[tableElements.length-1];};function removeDimensions() { let tableDimensions = document.querySelectorAll(".xbrl-dimension-row"); for ( tr of tableDimensions ) { tr.parentElement.removeChild(tr); };};function createDimensionRows(objDimension) { for ( obj of objDimension ) { let htmlContent = ` <tr class="xbrl-dimension-row"> <th class="xbrl-hover-title"> Dimension </th> </tr> <tr class="xbrl-dimension-row"> <td class="xbrl-hover-content"> <b>Name:</b> ${obj.dimensionName} </td> </tr> <tr class="xbrl-dimension-row"> <td class="xbrl-hover-content"> <b>Content:</b> ${obj.dimensionContent} </td> </tr>`; let previousEl = findLastElementRow(); previousEl.insertAdjacentHTML("afterend", htmlContent); };};/* FILL TABLE */function fillTableContent(obj) { var xbrlTagField = document.getElementById('xbrl-name-content'); xbrlTagField.innerHTML = tagName(obj); var periodField = document.getElementById('xbrl-period-content'); periodField.innerHTML = getPeriods(obj); var schemeField = document.getElementById('xbrl-scheme-content'); var identifierField = document.getElementById('xbrl-identifier-content'); schemeField.innerHTML = "<b>Scheme: </b>"+getSchemeAndIdentifier(obj).scheme; identifierField.innerHTML = "<b>Identifier: </b>"+getSchemeAndIdentifier(obj).identifier; /* Remove previous Dimensions and add new ones */ removeDimensions(); var objDimension = checkDimensions(obj); if (objDimension.length) { createDimensionRows(objDimension); };};/* POSITION TABLE */function placeTable(x_pos, y_pos) { var divXBRL = document.getElementById('xbrl-hover-table'); divXBRL.style.position = "absolute"; divXBRL.style.zIndex = 900; divXBRL.style.top = y_pos+'px'; divXBRL.style.left = x_pos+'px';};/* Return coordinates to position table relative to the element targeted. Position left if there is enough space, otherwise position right */function getCoordsObj(obj) { let rect = obj.getBoundingClientRect(); let top = rect.top + window.pageYOffset; let bottom = rect.bottom + window.pageYOffset; let left = rect.left + window.pageXOffset; let right = rect.right + window.pageXOffset; let full_width = document.documentElement.clientWidth; let height = top-bottom; let y_pos = top+(height/2); let x_pos; if (right+450 < full_width){ x_pos = right+50; } else { x_pos = left-450; } return { x_pos: x_pos, y_pos: y_pos, };};/* TABLE: Fill & Position */function fillAndMoveTable(obj){ /* position table */ coordinates = getCoordsObj(findParentElement(obj)); placeTable(coordinates.x_pos, coordinates.y_pos); /* get the element from which take the info */ xbralTagElement = getMainTag(obj); /* populate table with information */ fillTableContent(xbralTagElement); /* position table */ showTable();};function showTable() { var divXBRL = document.getElementById('xbrl-hover-table'); divXBRL.classList.add('show-table'); divXBRL.classList.remove('hide-table');};function hideTable() { var divXBRL = document.getElementById('xbrl-hover-table'); divXBRL.classList.add('hide-table'); divXBRL.classList.remove('show-table');};/* Search for Hidden Tags */function searchForHiddenTags() { const hiddenTags = document.getElementsByTagName('IX:HIDDEN')[0]; if ( hiddenTags !== undefined ) { for ( tag of hiddenTags.children ) { createRowHiddenElements(tagName(tag), tag.innerHTML, getPeriods(tag)); var hiddenDimensions = checkDimensions(tag); if (hiddenDimensions.length) { for ( dimension of hiddenDimensions ) { createRowHiddenElements(`Dimension: ${dimension.dimensionName}`, dimension.dimensionContent, getPeriods(tag), true); }; }; }; };};function checkHiddenTags() { let hiddenRows = document.getElementById('hidden-tags-tbody'); let hiddenTable = document.getElementById('xbrl-hidden-table'); if (hiddenRows.childElementCount == 0){ hiddenTable.classList.add('hide-table') };};function createHTMLTableHiddenElements() { var divHiddenElementsTable = document.createElement("div"); divHiddenElementsTable.innerHTML = ` <div class="xbrl-table" id="xbrl-hidden-table" style="width: 210mm; margin: 10mm auto;"> <table style="width: 100%; margin: 20px; padding-right: 40px;"> <thead> <tr> <th class="xbrl-hover-title" style="text-align: center;" colspan="3"> XBRL - Hidden elements </th> </tr> <tr> <th class="xbrl-hover-title" style="width: 40%; text-align: center;"> Element name </th> <th class="xbrl-hover-title" style="width: 40%; text-align: center;"> Content </th> <th class="xbrl-hover-title" style="width: 20%; text-align: center;"> Period </th> </tr> </head> <tbody id="hidden-tags-tbody"> </tbody> </table>`; document.body.appendChild(divHiddenElementsTable);};function createRowHiddenElements(name, content, period, isDimension = false) { var tbodyElement = document.getElementById('hidden-tags-tbody'); var trHiddenElement = document.createElement("tr"); trHiddenElement.innerHTML = ` <td class="xbrl-hover-content" style="width: 40%; padding: 3px;"> ${name} </td> <td class="xbrl-hover-content" style="width: 40%; padding: 3px;"> ${content} </td> <td class="xbrl-hover-content" style="width: 20%; padding: 3px;"> ${period} </td>`; if (isDimension) { var tds = trHiddenElement.getElementsByTagName('td'); tds[0].style.textIndent = "15px"; tds[0].style.fontStyle = "italic"; tds[1].style.fontStyle = "italic"; }; tbodyElement.appendChild(trHiddenElement);};})();
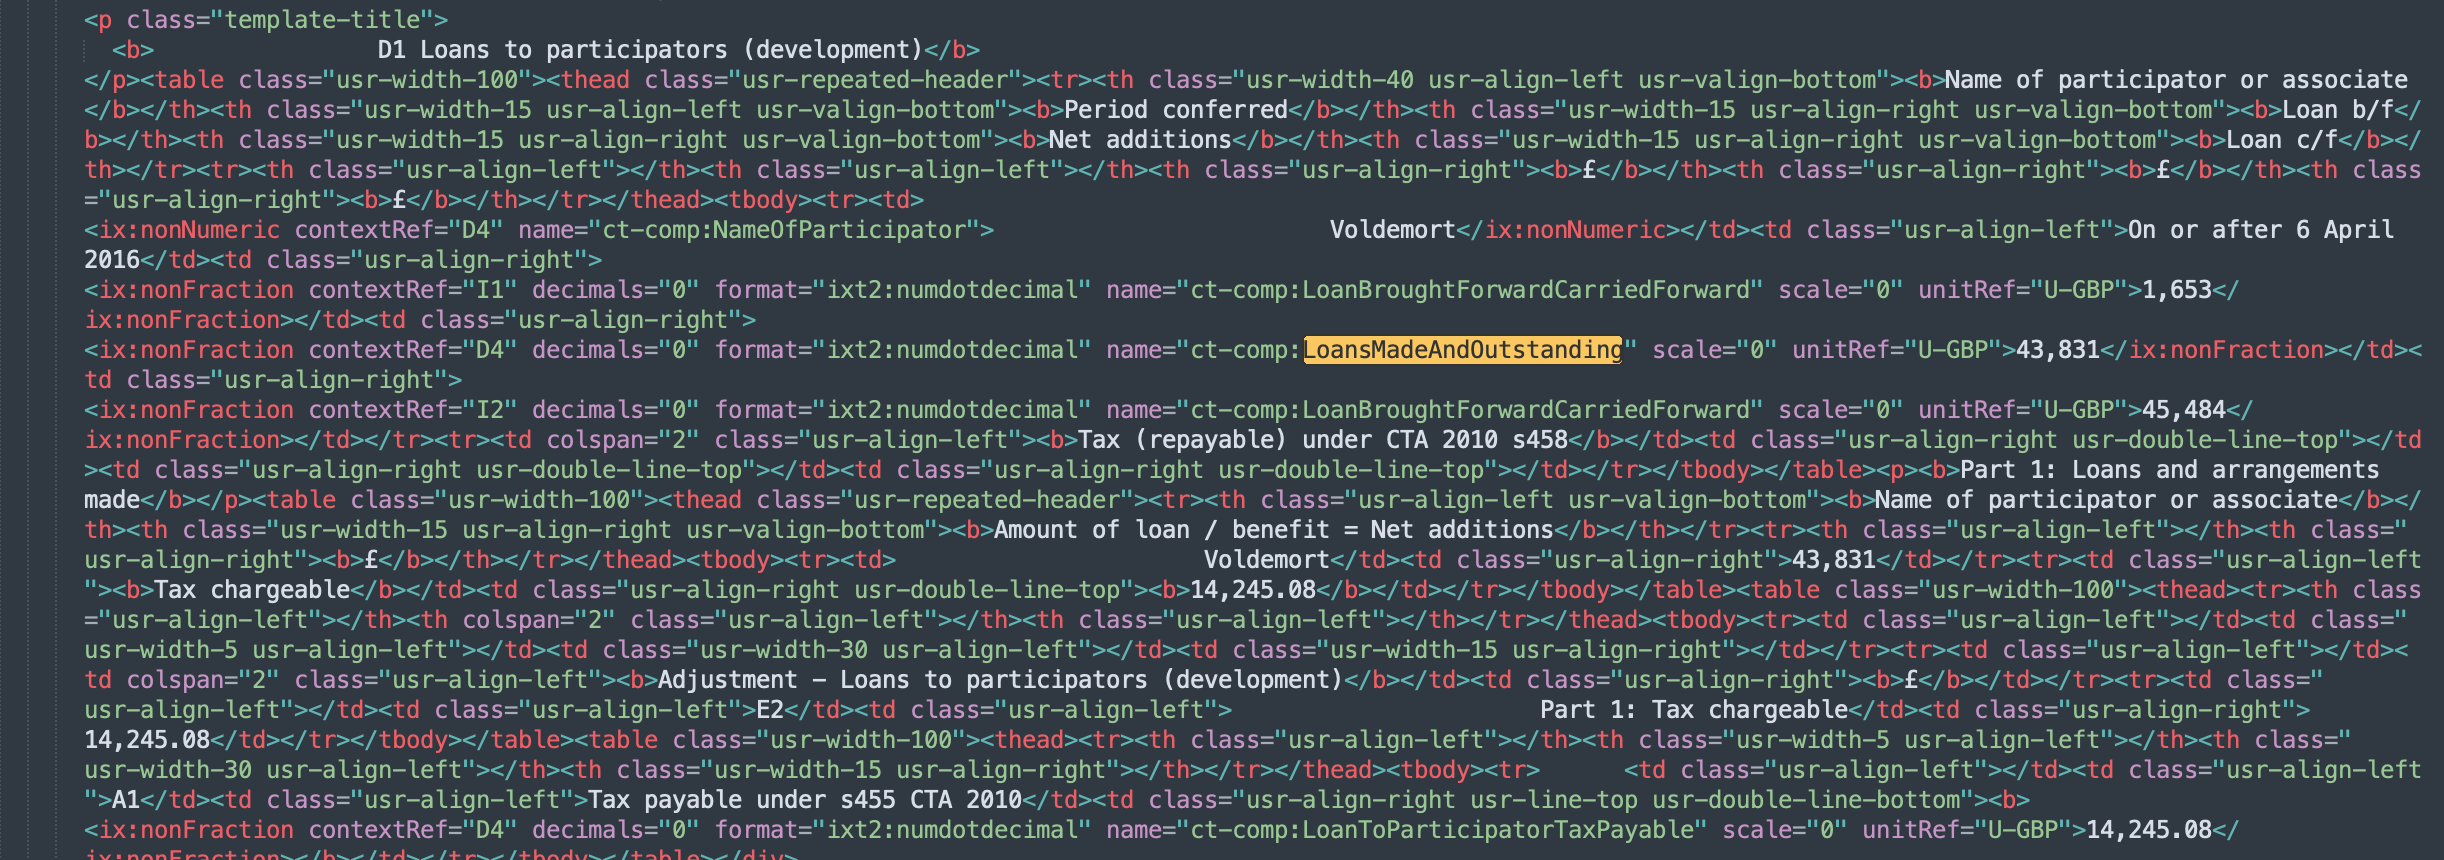
Debugging using the sXBRL file in a code editor
Updated 8 months ago